There are now 3 versions of this collection of the four related programs; this manual was originally distributed with the version for the BBC Model B (and Master) microcomputer; it has since been adapted for all 3 versions.
The sections of this manual are:The software will be more effective if used with a colour monitor, although all programs can be run using a monochrome display with suitable contrast and brightness settings. The package is compatible with the Watford 32K extension RAM or a TORCH pack or any second processors.
This set of programs was originally supplied on a 5.25in 40- or 80-track DFS floppy disc for the BBC Model B microcomputer. Single sided (40 track) discs have 3 of the programs on one disc, with the fourth one on another. The images of these two 'discs' are in the directories 'side0' and 'side2' in this archive.
Choose the way you want to run this program by clicking on your choice in the list below:
Somehow you have to get these directories 'side0' and
'side2' from the archive onto DFS floppy discs in order to run them on
a BBC-B or Master computer. They were read using an external 5.25" disc drive
on an A540, a Beebug disc interface and !DFS.
To Start
Insert the disc in drive 0.
Press SHIFT and touch the BREAK key to start. Or set the computer into
the Directory 'side0' and type CHAIN "MENU"
The disc should not be removed from the disc drive; because of the amount of material presented, the programs are written in sections, and pause from time to time to read more data from the disc. When this is happening, a message to 'Wait' appears on the screen and the disc drive is activated and makes a whirring noise: do not worry, this is quite normal. Click here to skip to the section on general running instructions.
These programs are simple adaptations of the ones written for the BBC-B with
just the machine dependent pieces changed to use standard BASIC
instructions. They are stored in a single directory. They run outside the
desktop, mostly in graphics MODE 1 with an introduction in MODE 7.
You will need a monitor capable of displaying these modes.
Download the RISCOS/zip and unpack it.
Copy the !CrystalSt application to a suitable directory, either on a hard
disk or on a floppy. Then double click on the !CrystalSt icon.
Click here to skip to the section on
general running instructions.
This version runs on PCs using DOS only. It can be run from systems using the 'Microsoft Windows operating System' but you will need to make yourself a DOS window to start from. Sorry we cannot tell you how to do this, there are so many slightly different versions of PCs.
You will need a CGA or EGA graphics adaptor. The program finds out for itself which you have and uses the appropriate set of modules.
Download the PCDOS.zip and unpack it using the unzip utility. Most of the
instructions are in this manual, but look at the README.TXT file for more
details. Copy the directory CCHEM to a suitable directory, either on a hard
disk or on a floppy.
From your DOS prompt, (usually the character > ) type MENU followed by the ENTER key (which may have an angled arrow on your computer keyboard). In a few seconds a menu appears on the screen, from which you can make your selection of program using single key presses.
Now follow the general operating instructions below, ignoring any statements about using different discs; on the PC version all the programs run from the same directory. On some Windows systems, the screen may not return properly to your normal operating screen at the end, but do not panic, usually you can type 'quit' even if you cannot see the characters on the screen. This usually closes the DOS window cleanly.
To return to the menu at any time, press the 'ESCAPE' key.
To exit the programs at any time, press the 'ESCAPE' key to return to the menu and press the 'Q' key.
In general, diagrams are shown on the left of the screen, explanatory text on the right. The bottom line of the whole screen is used for instructions, e.g. press SPACEBAR. When this line is blank, the program is showing an animated sequence, and you must wait until a further instruction is given. When an instruction uses the word 'press', only one keystroke is needed to continue the program; when you are asked to 'type' you may enter several characters, but the last one must be the RETURN key to show that this is the last character. The CURSOR keys, used in several places to rotate diagrams, are the four keys with arrows.
The programs are intended for use by individual students, to help them understand the basic concepts of atomic packing and crystal structure, and to introduce them to some ideas of symmetry and unit cells. They are designed to stand alone, but will be more effective used in conjunction with models, and as part of a general course in these topics.
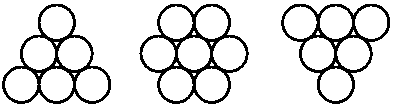
Some students find it helpful to handle real models while working through the programs. Suitable models were initially supplied with the package. These are no longer marketed, but you can make your own using, for example, table tennis balls, cemented together with model glue from any toyshop. You need three rafts of spheres as in the diagram:
This program deals with the concept of simple structures as an array of close-packed spheres. It compares the two common types of closest packing (hexagonal and cubic) and introduces some simple concepts of symmetry; an optional sequence explains about rotation axes. The relationship between the cube and octahedron is explored. Self-testing exercises are provided.
The 3 rafts of spheres are particularly useful in this program to illustrate the building up of the crystal in layers, and how the structure changes when the layers are in different orientations.
This program builds on what was learnt in the first. It introduces the concept of the unit cell as the repeating unit of pattern, explains how to reckon the unit cell contents and shows the relation between the cubic close-packed array and the face-centred cubic cell. The arrangement of interstitial sites is briefly explored and the tetrahedron is introduced.
This routine describes the other common type of packing, and reinforces the concept of the unit cell introduced in the previous programs. Coordination and packing density are discussed and compared with those of closest-packed structures. Transformations between the two types (important in metallurgy) are illustrated.
A suitable model was supplied using opaque and translucent spheres to show the relation between unit cell and packing. These are no longer available.
This program continues to explore the differences between HCP and CCP, now with the emphasis on the arrangement of interstitial sites, and the structures to be derived by filling them with a second type of atom. The NaCl, NiAs, Li2O, BeO and ZnO structures are described, and a number of self-testing revision examples are given. It uses the same model as the first program, plus some smaller spheres to simulate additional interstitial 'atoms' to assist in exploring derivative structures.
Slides for projection can be made by photographing the screen. Use transparency film of speed ISO 100 or 200. Mount the camera on a tripod, use a cable release and have the surroundings as dark as possible. For best results use a long focal length lens to minimise the distortion due to the curved surface of the screen. An exposure time of at least half a second is needed to overcome synchronisation problems. We have found an aperture of f8 with exposure time of 1 second is about right for ISO 100 film.
The development and distribution of this type of software is still in its early stages; comments, advice and criticism from users would be of value and are actively sought by the authors.